

How to set up tubeless tires
Tubeless tires have eliminated the risk of pinch flats. For riding in really rough terrain, they are a game changer. But like all new technologies, it’s taken some trial-and-error until we figured out how to run bicycle tires tubeless.
Of course, tubeless tires are nothing new. Car tires have been tubeless for decades, but translating that technology to much more flexible and lighter bicycle tires has not always been easy. (We don’t want to ride on rubber that’s as stiff and heavy as car tires!) Modern bicycle tires fall into three groups:
- Tires that require tubes. Apart from inexpensive tires that simply don’t have the technology for tubeless mounting, this category is more and more reserved for ultra-high performance tires with extremely supple sidewalls. The casings of these tires are difficult to make airtight, even with sealant. Ultra-supple tires are faster with tubes than stiffer, airtight tires set up tubeless. Narrow Rene Herse road bike tires fall into this category.
- ‘Tubeless-ready’ tires are covered with a rubber membrane – basically an inner tube is permanently vulcanized into the tire. These tires are airtight. You can just install them, and run them without inner tubes. However, the extra rubber makes them stiff and relatively slow.
- ‘Tubeless-compatible’ tires are not airtight, and they roll as fast as conventional tires. Their bead has been designed for tubeless installation, so you can run them tubeless – but they require sealant to make the casing air-tight and to seal the tire against the rim. The sealant also will seal small punctures that otherwise would cause a flat. Most Rene Herse tires are ‘tubeless-compatible.’
Key to mounting tubeless tires is the right technique. This is especially important with supple tires. Stiff tires mount easily – just like car tires – because their casing is so stiff that it either touches the rim walls and seals, or it doesn’t.
Supple casings make tires fast and comfortable because they flex easily. At first, they often contact the rim in a few places, and have air gaps in others – making them harder to mount and seal tubeless. They follow the general rule of high-performance components: The tolerances need to be a bit tighter, and working with them requires a little more skill.
It’s not hard to install supple tires tubeless, if you work methodically. Here is how I installed my Rene Herse Extralights tubeless while traveling in Japan, with no access to a workshop and just a few tools.
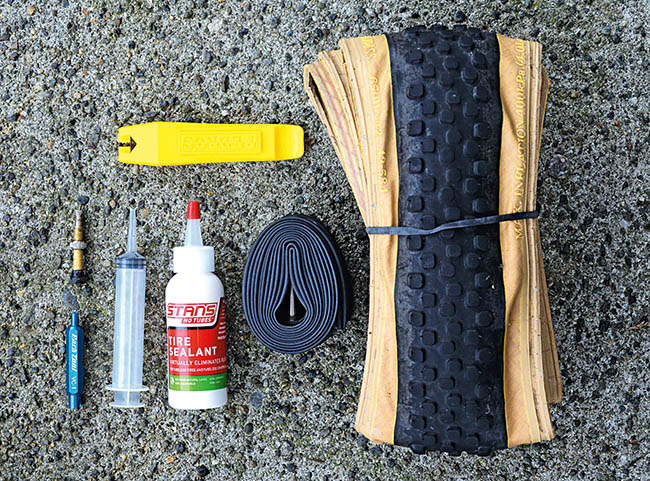
To mount a tire tubeless, here is what you need: a tubeless valve; a valve core tool; a syringe for injecting the tubeless sealant; sealant; a tire lever; an inner tube; a tubeless-compatible tire. Your rims also must be tubeless-compatible, and covered with tubeless rim tape. It’s good to have extra rim tape on hand.
I only could find Stan’s sealant in Japan. It worked fine, but we recommend SealSmart because it does a better job sealing the slightly porous sidewalls of supple tires.
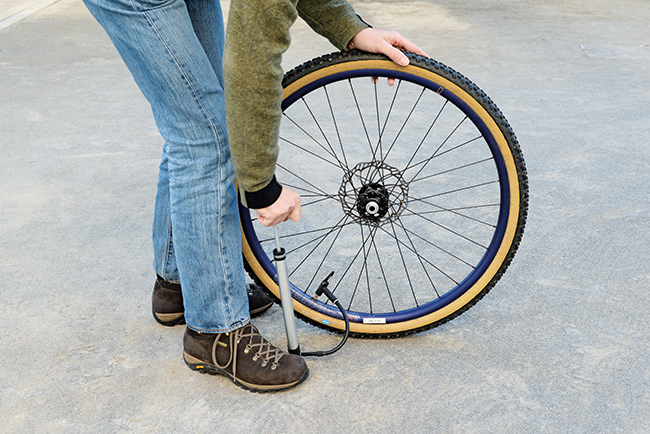
You also need a pump to inflate the tire. A floor pump often suffices, but an air compressor makes the job a lot easier. Just be careful and don’t use the compressor to make up for problems in tire/rim fit. Otherwise, your tire may blow off the rim later without warning.
For safe tubeless installation, a good fit between tire and rim is extremely important. Unfortunately, many OEM rims are slightly undersize, because that makes it easier to install tires in the bike assembly plants. (Imagine a rim that is slightly oversize. For a factory that needs to mount 10,000 tires a month, spending five extra minutes per tire would be a total disaster. That is why OEM rims tend to run small, and never should be larger than spec. OEM tires are installed with tubes, where a slightly undersize rim doesn’t pose a problem. However, it can be impossible to achieve a safe tubeless installation on these rims.)
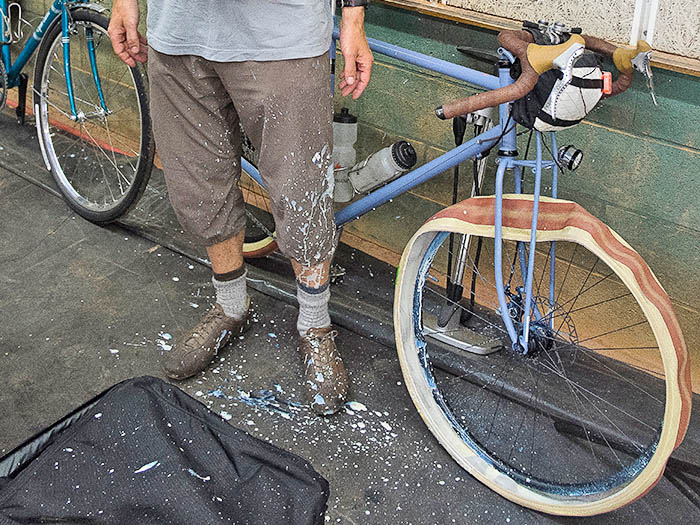
If your tire goes on very easily and seats completely at relatively low pressure (<40 psi/2.8 bar), the rim is probably undersized. Don’t try to install the tire on this rim. It may work fine at first, but it can blow off the rim without warning. If this happens in your workshop, it’s just a nuisance (and a big mess, above). If it happens on the road, the consequences can be far worse.
If your rim is undersize, it’s not the end of the world – there is often a solution. Build up the rim bed with additional layers of rim tape. Some mechanics use Gorilla Tape for the extra layers – it’s a little thicker than standard tubeless tape. (Always use tubeless tape as the first layer on the rim to seal the spoke holes.) The tire should be a slightly tight fit. This makes sure that it seats correctly and doesn’t blow off the rim later.
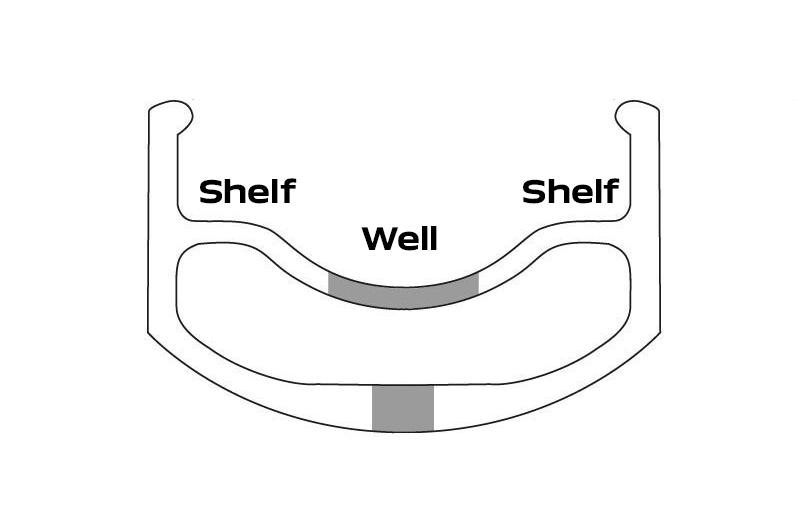
Before you mount your tires, inspect your rim tape. It needs to make an airtight seal with the rim. If you have any doubt – if there are gaps, wrinkles, or if the tape is folded over – replace it. Wipe the rim with alcohol to remove oils and other residue from the manufacturing process. When you install new tape, first push it onto one shelf, then into the well, and only then onto the second shelf. This ensures that the tape goes on straight and centered. It’s hard to overstate how important this step is: Many ‘leaky tires’ can be traced to a poor seal between the rim tape and the rim – and then the air escapes through the spoke holes to the inside of the rim.
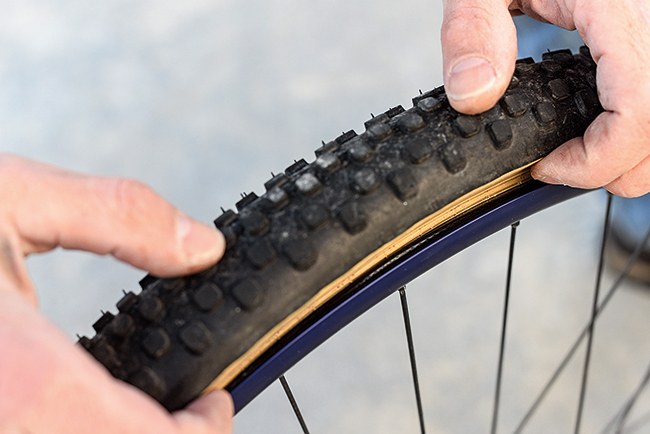
When installing tires, make sure that the bead is in the rim well (above) all around before you lift the last part of the bead over the rim edge. The well is there to provide slack for the bead – the rim’s diameter is smaller in the center than toward the rim walls. With supple tires and tubeless rims, parts of the bead can end up on the shelf when you mount the tire. Push the bead into the rim well all around the tire – then the last bit of the bead will slip easily over the sidewall.
We recommend installing the tire with a tube first. The tube pushes the rim tape into place and makes sure it adheres properly to the rim. This prevents sealant from seeking between rim and tape and dislodging the tape. This makes sure that no air can escape through the rim’s spoke holes… (Also make sure to wipe off the rim with alcohol before installing the tape to remove all oils and residue from the manufacturing process.)
If you use a floor pump to seat the tire, the tube also seats the beads and gives the tire its shape. Make sure both beads pop into place. Then unseat one bead (the one that popped into place first) by pushing it into the rim well, and remove the tube.
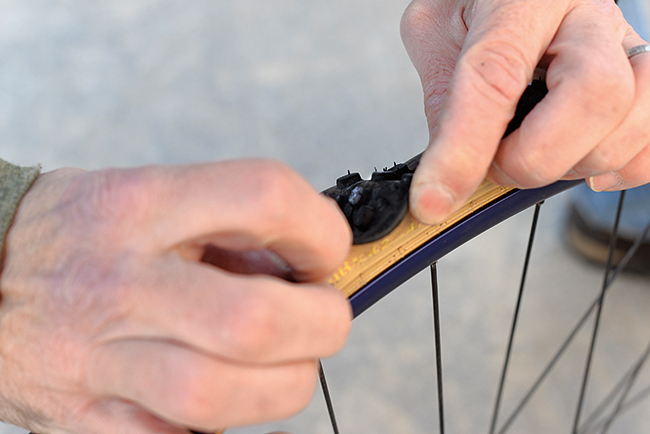
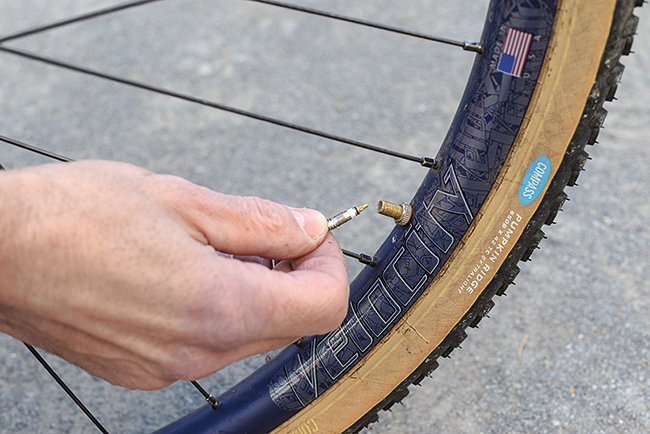
Install the tubeless valve. Don’t forget the valve nut that holds the valve in place. It pulls the valve’s rubber cone into the rim’s hole to create a tight seal. Don’t overtighten the nut: If the valve gets clogged with sealant or the tubeless setup fails, you’ll need to be able to remove the valve on the road to install a tube.
Before you inflate the tire, seat the bead as far around the rim as possible, starting at the valve.
Pull the tire upward and move the bead outward, until it sits on the shelf next to the rim wall.
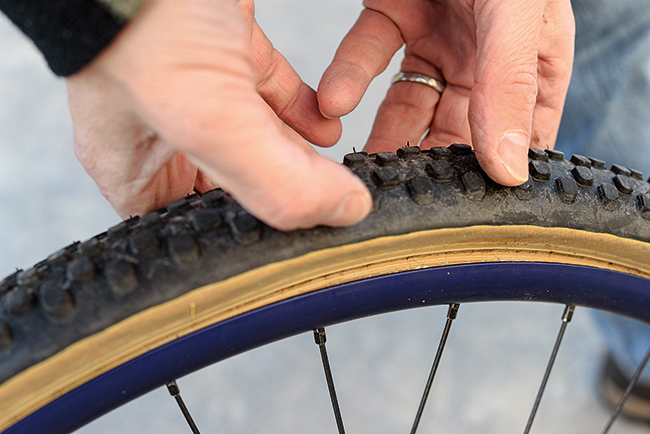
Continue until the tire is too tight to pull upward. The remaining air gap is small and furthest from the valve. It will seal as the pressure pushes the tire outward.
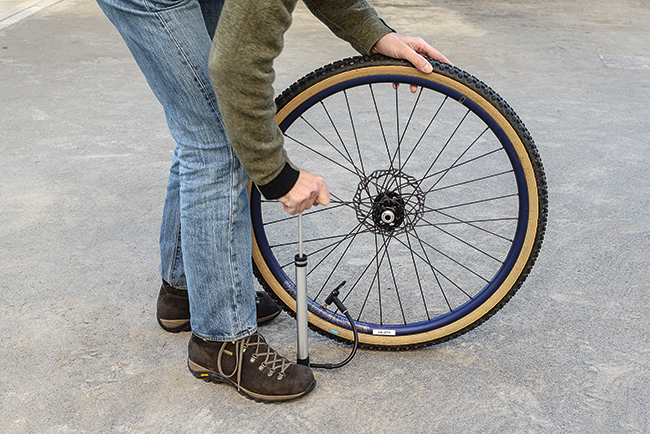
Inflate the tire ‘dry’ without sealant at first. That way, if you need to remove the tire to add more rim tape, there won’t be messy sealant inside. Pump quickly to build up pressure faster than the air escapes.

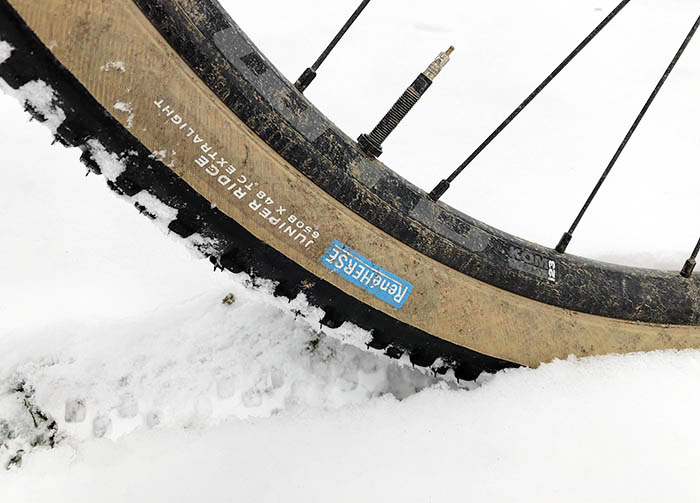
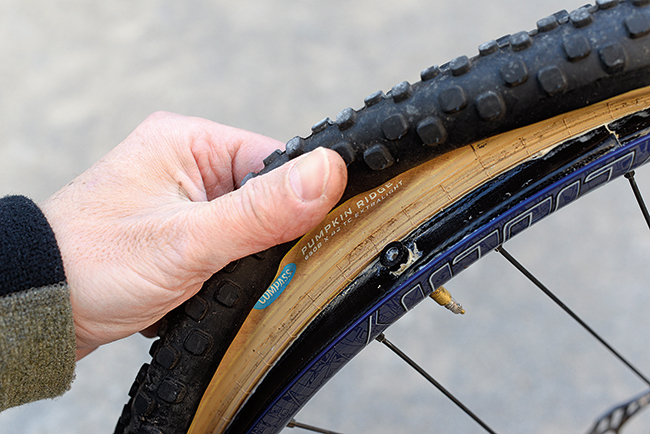
Watch the tire as it seats. On the left, the line molded into the tire sidewall is still hidden by the rim wall. The bead hasn’t emerged from the rim’s well yet. Keep pumping until you hear a loud ‘pop’ as the tire seats. On the right, you can see all of the line that is molded into the sidewall. Make sure it’s parallel to the rim edge all around the tire. Check this on both sides. If it’s OK, then the tire is seated on the rim. (Click on the image for a larger version.)
Keep inflating the tire to the maximum pressure of your rim or tire, or 60 psi/4.1 bar (whichever is lower). (60 psi/4.1 bar is the maximum pressure for Rene Herse tires tubeless.) This makes sure the tire is seated completely and without small gaps between tire and rim.
Now the tire is inflated and looks great, but air will escape through small cracks and microscopic holes. To seal the tire, add sealant. Let out the air and unscrew the valve core. The beads will remain seated. (If a bead comes unseated now, it wasn’t properly seated in the first place.)
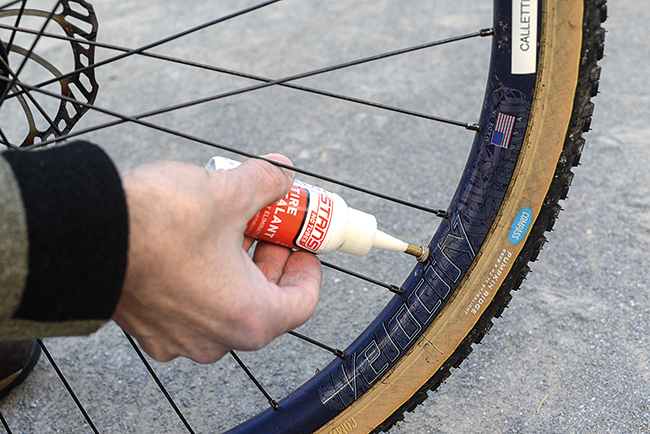
Turn the wheel so the valve is neither at the top nor at the bottom of the tire, where sealant would spray back out of the valve. Shake the sealant vigorously for a minute, so the solids are in suspension. Don’t skimp on this step! Otherwise, you’ll just inject colored water into the tire, and it won’t seal.
For our Rene Herse tires, we recommend Seal Smart sealant. It seals supple sidewalls better than other brands. When mounting the tires in the photos, I was in Japan, and the Seal Smart sealant had not yet been released. I couldn’t find our second choice, Orange Seal. So I used Stan’s. It worked fine.
Make sure to use enough sealant. Wide tires have a lot of surface area. How much sealant you need depends on the width of your tire:
- 25 – 32 mm: 60 – 90 ml (2 – 3 oz.)
- 35 – 42 mm: 90 – 120 ml (3 – 4 oz.)
- 44 – 55 mm: 120 – 150 ml (4 – 5 oz.)
For the 42 mm tires I installed, I used 1.5 of the small bottles of sealant per tire.
If the solids in your sealant clog your injector, that’s actually a good thing: They’ll also close small punctures in your tires. In that case, break one bead free from the rim, partially remove the tire on one side, pour in the sealant and reinstall the tire. Since it’s already been installed once, it should go on easily.
Replace the valve core. When I installed the tires tubeless in Tokyo, I didn’t have a valve core tool. A small adjustable wrench will do the job in a pinch.
Inflate the tire again. Since it’s already seated, this will be easy. Make sure to completely seat the tire: Inflate to the max. pressure of tire or rim, or 60 psi/4.1 bar (whichever is lower).

Close the valve. Now the tire looks ready to roll, but the sealant must still be distributed to seal all the microscopic gaps. Just riding the tire isn’t enough to stop all the tiny leaks.
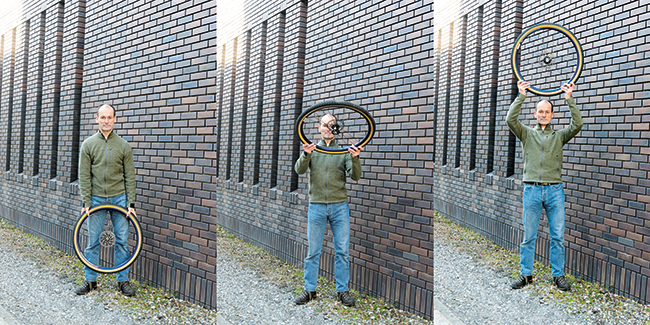
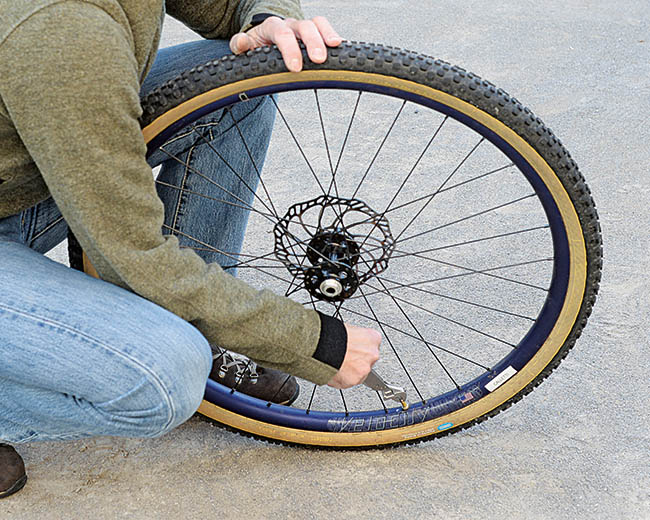
There are different techniques for distributing the sealant, but not all work equally well. With stiff tires, there’s less need to work the sealant into every part of the tire and rim interface. For supple tires, this technique works best, because it methodically covers every inch of the tire and rim interface. Make sure you have enough room. Don’t hit the ceiling, furniture, or your head. (Don’t ask how I know!)
Hold the wheel steady (left), so the sealant collects at the bottom. Quickly move the wheel upward (center). Centrifugal force will keep the sealant right under the tire tread. Hold the wheel over your head (right), still slightly tilted away from you. Now the sealant runs downward, covers the sidewall, and seeps into the gap between tire and rim.
Rotate the wheel a few degrees and repeat. (Start with the valve at the bottom, so you have a reference point.) Once you’ve worked all the way around the tire, turn the wheel around, and repeat on the other side. Now your tire is ready to ride. Go for a ride immediately, even if it’s just a few times around the block. This will help distribute the sealant further.
If your tire loses air overnight, check it like a leaky inner tube. Often, you can hear and feel the air escape. Or put the bottom of the wheel in a small tub of water and watch for bubbles. Once you’ve identified the leak, hold the tire so that gravity pulls the sealant into the leak. If it doesn’t seal, there may not be enough sealant in the tire.

Now your tubeless tire is ready to roll. Enjoy the ride!
Tubeless tips:
- Smart Seal works best to seal the supple casings of our Rene Herse tires.
- Use enough sealant. More sealant makes your tires slower, but if your tire runs out of sealant, it’ll start losing air. If you want to go fast and don’t need to worry about pinch flats, use inner tubes. (Click here to read more about why tubeless tires are slightly slower than tires mounted with tubes.)
- Sealant needs to be topped up at least once a month. Supple tires push and pull slightly against the rim sidewall as the wheel rotates. If the sealant dries out, air will start leaking. Then the tire can suddenly break loose from the rim wall and lose all its air. Don’t ride your tires when there is no liquid sealant left inside – the sealant not only acts as flat protection, but it constantly seals the tire against the rim.
- Use only new tires for tubeless installation. As a tire is ridden, the sidewalls flex and become more porous, making them harder to seal.
- If you want the flat protection offered by the sealant without the hassle of tubeless installation, you can put sealant in your inner tubes. This also works best with new tires, and you obviously need tubes with removable valve cores. (The tubes we sell have removable cores.) Simply put some sealant inside the tube, and it’ll seal many punctures.
- Most Rene Herse tires are tubeless-compatible. This is listed in the tire’s description on the web site, and the label on the package says ‘Tubeless-Compatible.’
