

My PBP Bike: Fenders

Until 1991, all bikes in Paris-Brest-Paris had to be equipped with fenders. Traditionally, this had been a way to distinguish randonneur events from races – the randonneurs were expected to ride bikes that were equipped for real-world riding. However, by the 1980s, there simply weren’t many performance bikes with fenders any longer, and most riders struggled to put fenders onto their racing bikes. The rule no longer made sense, and so it was abandoned.
Now that fenders are no longer required in Paris-Brest-Paris, why run them at all? Apart from the fact that the fenders are an integral part of my bike, the weather during a 1200 km (750 mile) ride is always unpredictable. It doesn’t have to be a year like 2007, where I rode 49:49 hours in the rain. Even a short thunderstorm during a sunny afternoon will soak your shorts if you don’t have fenders, and riding in wet shorts can lead to saddle problems and end your ride prematurely.
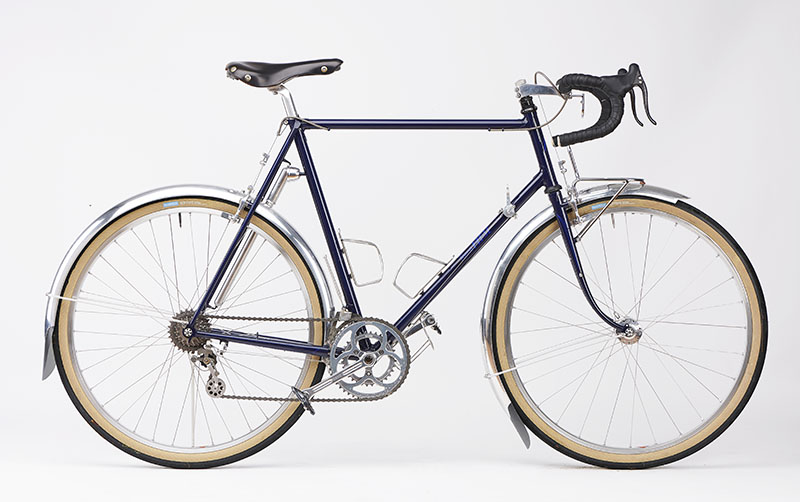
Until about 15 years ago, German-style plastic fenders were pretty much the only style available in the U.S. They worked OK…but I recall my surprise when I rode in the rain for the first time with a set of French-style aluminum fenders: The fenders kept not only my back and upper body dry, but my legs and feet, too.
There’s a lot to fenders that doesn’t immediately meet the eye. Aluminum fenders have rolled edges that keep the water inside. Plastic fenders don’t. In fact, they usually have brackets riveted to the inside where the stays attach. These brackets act as dams and divert the water in the fender outward, until it drips onto your feet. It may not sound like much, but a drop every second will have your feet soaked in no time.
Another important point is coverage. The water that the fender catches must go somewhere. Most of it runs down and exits the fender at the bottom. There it is incorporated into the spray that comes off the wheel. Your front fender needs to extend downward far enough that all this spray does not hit your feet – otherwise, they’ll get wetter with fenders than without. The front fender should reach to within 12 cm (5″) of the ground – just high enough that it doesn’t get caught when you roll down a curb. A mudflap is useful to reduce that gap further; otherwise you’ll still get wet feet during fast downhills.
The difference between excellent and mediocre fenders is as great as the difference between mediocre fenders and none at all. Once your feet stay dray, you realize that, compared to the spray that comes off your wheels, relatively little rain is falling from the sky. And your drivetrain also stays dry and clean. Since running fenders, I rarely have to lubricate my chain.

To get sufficient coverage on the front, we used to install a cut-down rear fender on the front wheel. Having to buy two sets of fenders was expensive and wasteful – what do you do with the two front fenders that are left over? So we worked with Honjo in Japan, who make the world’s best fenders, to make Rene Herse fenders with sufficient coverage from the get-go.

Fenders inevitably add weight, but it’s less than most people think. Aluminum fenders are lighter than plastic ones, because the fender is stiffer, so only need two light aluminum stays, rather than four heavy steel ones that you find on plastic fenders.
Rene Herse fenders are lighter yet thanks to their tubular aluminum stays. There’s a story behind these: Many years ago, during one of my visits to Lyli Herse, we rummaged through her workshop, looking at everything that was left of Cycles Rene Herse: tools, parts, jigs, photos… We came across long lengths of aluminum tubing. Time had oxidized the aluminum. It was clearly decades old. What was its purpose? It took us a while to realize that this was the material Rene Herse had used for the fender stays of his bikes for the Concours de Machines, the competition for the best (and lightest) cyclotouring bikes.
My first Herse used some of that old tubing for the fender stays, and they’ve worked without problems for 20,000 miles, including hard rides like the 364-mile Oregon Outback gravel race. Clearly, they were strong enough, and they save 35 grams. So you don’t have to look for high-strength 5 mm aluminum tubing, we’re offering tubular stays as an option for our Rene Herse fenders.
Mounting the fenders well is essential for their performance. Ideally, all bridges are equidistant from the wheel centers, so the fenders mount easily. The bridges have threaded holes, so the fenders can be mounted directly. (You can use brackets if your bike doesn’t have fender mounting points.) A leather washer goes between fender and frame to keep things quiet and prevent the fender from rattling loose. Leather works better than plastic here, and you want high-quality, firm leather. (Our leather washers are made from scraps left over during the manufacture of handlebar bags.)
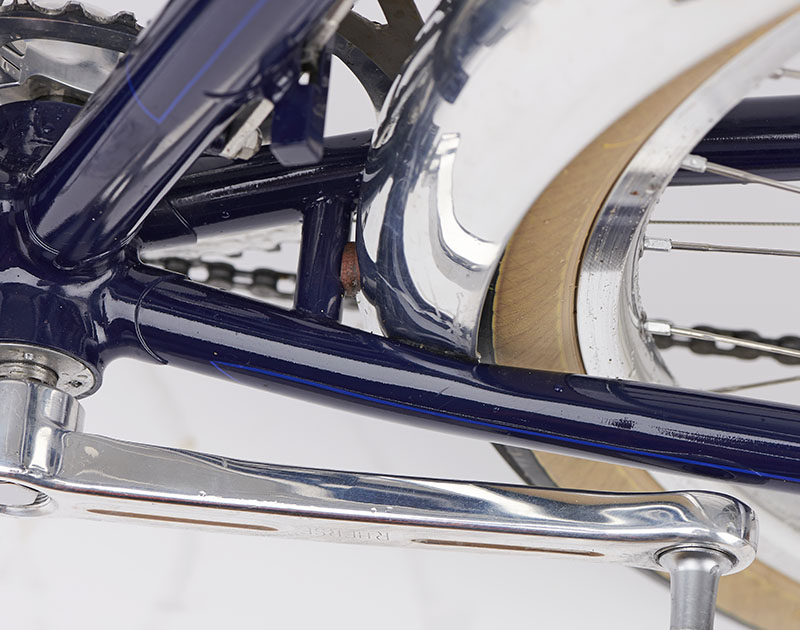
Where the fender fits between the chainstays and fork blades, it’s important to indent the fender and not cut it. That maintains its strength, whereas a cut will weaken the fender, and it may crack in the future. And since the stays and fork blades provide fixed points for the fenders, it’s OK if the fender clearance is a bit smaller in these spots.
![]()
Speaking of clearance, for safety and to prevent the fender clogging up with mud during winter gravel rides in the Cascade Mountains, I set my fenders with 20-25 mm (0.8-1.0″) clearance above the tire. That way, small stones that could crumble the fender simply pass through without doing damage. (Big stones are too heavy to be picked up with much force, so they just bounce off the rear edge of the fender.)
In the photo, you also can see the essential attachment point in front of the fork crown. On my bike, it’s part of the rack. It stabilizes the fender, making it quiet even on the roughest roads. It’s also essential for the durability of the fender. If you don’t have a rack with a mounting point, you can use a second fender stay. That’s why we sell fender stays separately, together with the hardware to mount them. Mounted correctly, aluminum fenders last as long as the bike they are attached to.
As an aside, you can see how I reshaped the end of the fender. It’s something Rene Herse did on his bikes, and I always thought it was a nice touch.
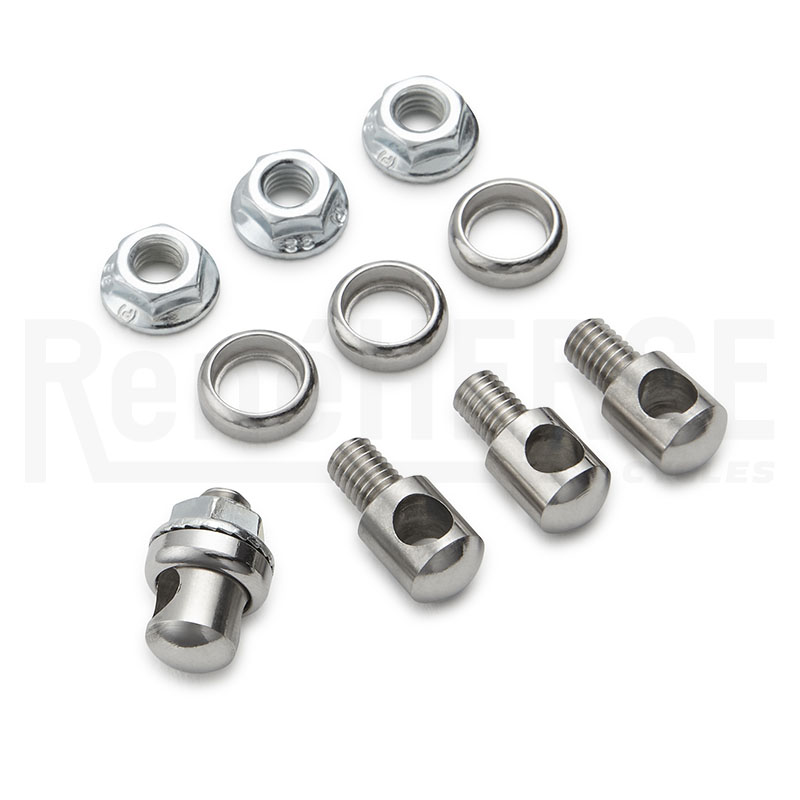
Another Rene Herse touch are our custom-made eyebolts for the fender stays. The rounded shape is a little lighter and a lot more elegant, but more importantly, the bolts don’t protrude into the inside of the fender any further than necessary, so there’s less risk that something gets caught on them. The tensiloc nuts we use to tighten the eyebolts won’t come loose, no matter how fast you ride and how rough the roads are. They cost a bit more (actually, they cost 9x as much as standard nuts), but for me that is worth it: Fenders should be install-and-forget components.
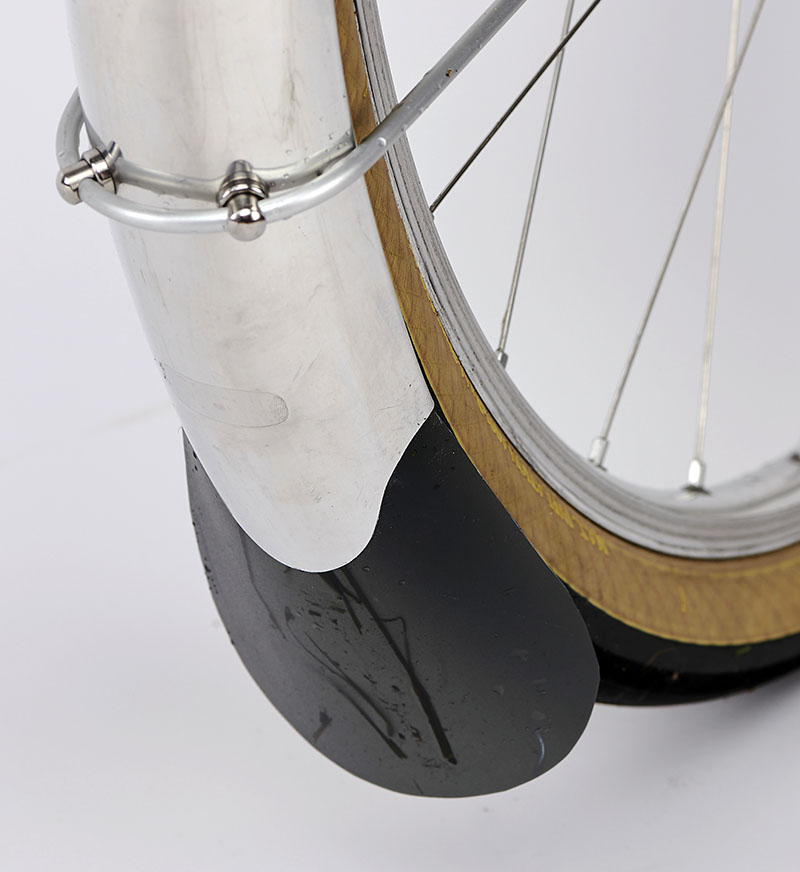
A lot of readers have asked about my mudflaps. There’s no big secret – I cut them out of a thin plastic file folder. I first made a cardboard template, then transferred the shape onto the plastic. They slide into the rolled edges of the fender and reach up far enough that the fender stay bolts hold them in place. The holes in the mudflap are large to fit over the nuts on the eyebolts, so the mudflap simply snaps in place. Installing and removing takes just seconds. Last year’s Paris-Brest-Paris was dry, so I took off the mudflaps and carried them in my handlebar bag, just in case. (They weigh just a few grams.) Our wind tunnel tests have shown that mudflaps add a little drag, whereas the fenders themselves shield the tires and improve the bike’s aerodynamics. So on my performance bike, I don’t use mudflaps unless I need them.
On my other bikes, I make the mudflaps from thin rubber sheets that you can buy at hardware stores to make your own gaskets. I install those mudflaps permanently by crimping the fender edges so they hold the mudflap firmly in place. Some riders use leather mudflaps, but I’ve found them to be too flexible, especially when they get wet. During fast descents, they extend straight back and become ineffective just when I need them most.
Update 1/2023: Rene Herse now offers mudflaps based on the design I use for my PBP bike.

Of course, there’s more to fenders and how to install them, which is why all Rene Herse fenders come with detailed, illustrated instructions. But now it’s time to head out for a ride rather than think more about fenders…
Other parts in this series:
- My PBP bike: the frame
- My PBP bike: the wheels
- My PBP bike: contact points
- Why I choose centerpull brakes
- My PBP bike: rack and bag
- My PBP bike: lights
- My PBP bike: derailleurs
Photo credits: Duncan Smith (Photos 4, 7); Nicolas Joly (all others).
