

8 Checks to Get Your Bike Ready for the Season (and PBP)
Whether you are going to ride a brevet with an eye on qualifying for Paris-Brest-Paris, whether you plan to ride a century or race, or whether you just want to enjoy exploring this season, having your bike in good condition is the best way to guarantee success. If you are confident in your bike, you can enjoy the ride without worrying whether you’ll make it to the finish. Here are 8 things to look at:
1. Clean your bike
It’s much more fun to work on a clean bike, so the first step should be to clean your bike thoroughly. This is a good opportunity to check for cracks. Components and frames don’t fail suddenly (unless you jump off a huge cliff), but cracks form and grow until there isn’t enough material left, and the part breaks. Finding a crack before it grows and breaks can prevent a crash. Check for cracks especially on the cranks and rims. On the frame, inspect the area around the bottom bracket and the rear dropouts.
Also check that fenders, racks, lights and other bolted-on parts are tight. This is best done by checking each bolt, but if you are in a rush, just give each part a firm wiggle.
Once your bike is clean and found to be generally sound, it’s time to inspect individual components.
2. Tires
Are your tires worn? How do you check? The best way is to remove the tire and flex it with your hands. Is the center part of the tread thinner than the shoulders? Then your tire often shows a groove in the center when you flex it. Replace the tire now, rather than risk having multiple flats – or worse, a blowout – during your brevet. Cut the old tire in half, so you can see how much tread remained. If there is 1 mm of rubber or less (not including the casing) in the center of the tread, then it was high time to replace. If there is much more, you could have ridden the tire a bit longer. It’s good to know for next time.
3. Brake Pads
Are your brake pads worn out? Modern pads often seem to be made entirely out of rubber, but in reality, there is a metal carrier embedded in the rubber. When that gets exposed, it will score and ruin your rim. Most pads have a “wear line” molded into them that show how far you can wear them down.
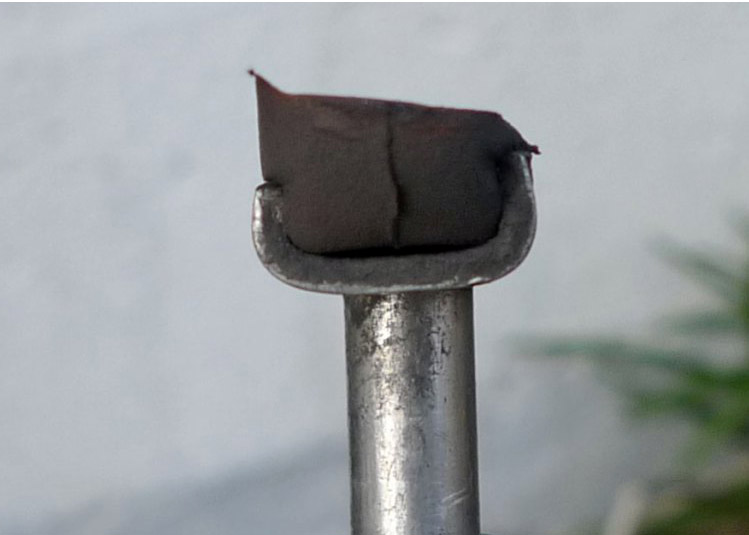
Also make sure the pads hit the rims squarely. Check the pad itself. If a ridge has worn into the pad either at the top or bottom (photo above), then it doesn’t hit the rim correctly. Remove it, file off the ridge, then reinstall it with the correct alignment. Poorly aligned pads can cause blowouts if they hit the tire (with sidepull and centerpull brakes) or they can dive underneath the rim, causing a complete loss of braking (with cantilever brakes).
4. Rims
The second part of your braking system are your rims. They abrade as you brake, and eventually, they get so thin that they can explode from the tire pressure. Many modern rims have wear indicators, either a groove or a dot that are machined into the sidewall. When these wear indicators disappear, it’s time to replace the rim. On rims without wear indicators, look whether the sidewalls have become concave. That shows you how much wear has occurred. Worse, if the sidewalls start splaying outward near the tire bead, they are so thin that the tire pressure forces them outward. Replace them immediately!
If you replace the rim with a similar model that uses the same spoke length, you can just swap the spokes from one rim to the next without completely rebuilding the wheel. (For detailed instructions, refer to the “How-to” article in Bicycle Quarterly No. 50.)
5. Cables
Check your brake cables: Pull on the brake levers and feel whether the action is smooth. If you feel grinding or extra friction, then the cable is probably fraying. Replace it now!
If you have downtube shift levers, you can see whether the cables are fraying – it usually happens where the cables wrap around the shift lever. If you have bar-end or brake/shift levers, you may just replace the cables as a precaution at the onset of the season. If the rear shifter cable breaks, you’ll be reduced to your largest gear – not much fun during a long ride.
6. Wheels and Spokes
Are your wheels true? Spin them and look at the distance between rim and brake pad. It should remain constant within 2 mm. Also squeeze the spokes in pairs and see whether any are loose or broken. You can also twang the spokes like guitar strings. The pitch should be similar for all spokes on the same side of the wheel.
If the wheel isn’t true, or spokes are loose or broken, either fix it yourself or take it to a qualified wheel builder. If you have broken two or more spokes in one wheel, it’s a sign that all spokes are getting fatigued. Rebuild the wheel with new spokes now, rather than having to deal with more broken spokes during the season.
7. Bearings
Check whether your bearings are in good shape. Remove the wheels and feel whether the axles spin smoothly. On modern sealed bearings, some resistance is fine, but it should be smooth, without any catching or roughness as you turn the bearing. Bearing play is best checked with the wheel on the bike. Push and pull on the rim and see whether you can feel play in the hub bearings. (Sideways movement is fine – wheels aren’t very stiff laterally – but there shouldn’t be a “knocking” feel.)
Check the bottom bracket the same way after dropping the chain to the inside of the cranks, so it rests on the frame’s bottom bracket shell. For the headset, turn the handlebars 90°, lock the front brake, and rock the bike back and forth. You should not feel any play. (If you don’t turn the handlebars, you may feel play in the brake and mistakenly conclude your headset needs adjustment.) Don’t forget to check the pedal bearings by turning and wiggling the pedals.
Worn bearings won’t slow you down significantly, but they make riding the bike less pleasant. Eventually, they’ll pack up and stop turning altogether. And then your ride is over!
8. Drivetrain
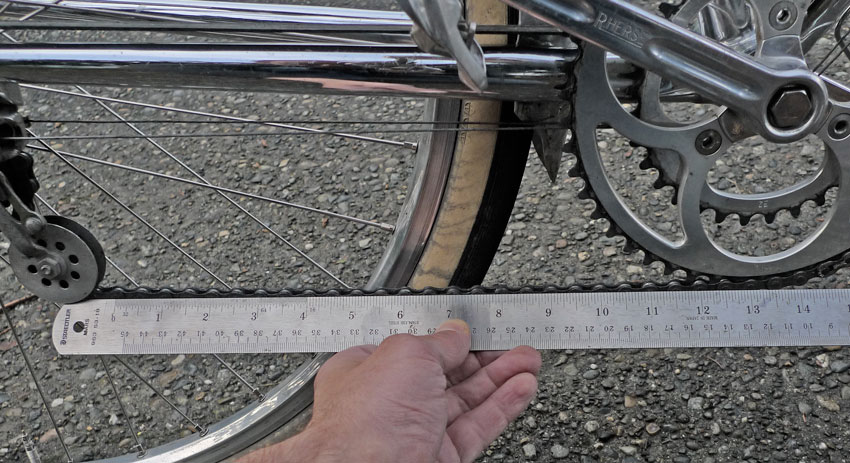
Make sure that all gears can be shifted smoothly. Check whether your chain has lengthened because the bushings have developed play. There are gauges that show how much your chain has “stretched”, but you can also measure it with a ruler:
Pull the rear derailleur rearward to tension the chain. Take a ruler and hold it against the lower chain run. Line up the 0 with a chain pin. The 12″ (1 foot) mark should line up with another pin. If it is more than 1/16″ off, the chain has worn and should be replaced. Unfortunately, it’s likely that your cassette cogs are worn out, too. If you have a big event coming up, test-ride your bike to make sure the new chain meshes smoothly with the old cogs. Pedal hard in each gear for a block or two. If the chain skips over the cog, the cassette is worn out and should be replaced.

Now you know your bike is in good condition. Unless you ride huge distances, it shouldn’t require much maintenance during the season. Check the chain wear every thousand miles or so, keep an eye on the brake pads and tires, and you should be fine. That allows you to enjoy the cycling season confident that your trusted steed won’t let you down. Now it’s time to plan your rides!
What other pre-season checks do you perform on your bike?
Also in this series:
Correction (3/27): The post has been edited to reflect that play in the hub bearings is best checked with the wheels installed (see comments).
