

Does My Bike Take Fenders?
We often extol the virtues of aluminum fenders over plastic ones: They keep rider and bike drier and cleaner, they last longer, they don’t make noise on rough roads, and they are lighter. (I also think they look better.)
Metal fenders’ major disadvantage is that they require a bike designed for fenders. While you can retrofit plastic fenders with zip-ties, clamps and brackets, these devices do not work well with metal fenders. Plastic fenders are pulled into shape by the stays, which makes them easy to mount. The resulting inbuilt stresses are one of the reasons plastic fenders have a limited lifespan, but they work fine for a few years.
If you pull aluminum fenders into shape using the stays, the stresses will cause the fenders to crack within months. Basically, metal fenders really are worthwhile, but they must be mounted correctly. For that, you really need a bike designed for fenders.
What does “a bike designed for fenders” mean? Many manufacturers believe that all you need are slightly larger clearances around the tires and a set of eyelets on the dropouts. In reality, it’s not that simple. Here are the requirements that make fenders installation easy (even if you use plastic fenders!):

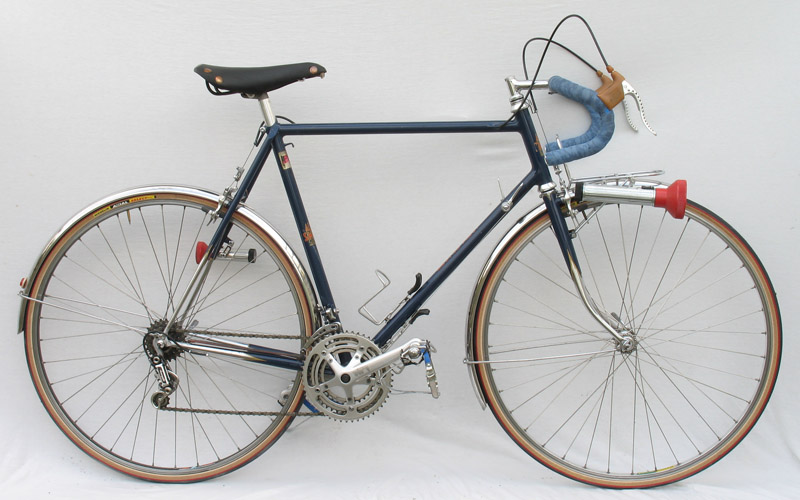
Clearances: Obviously, you need room for the fenders. It’s often shocking to see how generous the clearances are on classic French cyclotouring bikes, once you remove the fenders. The photos here show a 1940s Derche tandem, which has especially large clearances. Even on this bike, you won’t see “air” between fender and tire when the fenders are installed. The clearances are spot-on for what the builder wanted to achieve. (It’s also possible that the original tires were taller than the Hetres is carries now.)
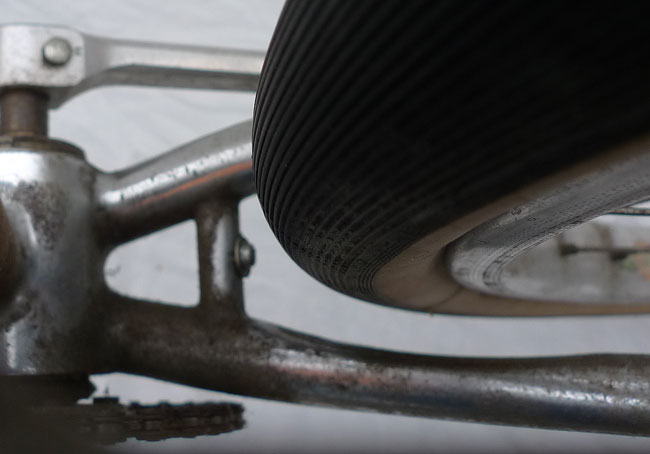
You can get away with smaller clearances and still have fenders that work fine. You need at least 12 mm between tire and fender, plus about 1 mm for the fender, and another 2-3 mm for the leather washer that cushions the fender against the frame. This adds up to about 15 mm between tire and bridges/fork crown. (Better would be about 20 mm.)
On the sides of the tires, you don’t need as much room, because there are no bolt heads protruding inside the fenders. 8-10 mm is about right, and 6 mm still is tolerable. (You can install fenders with even tighter clearances, but they are likely to rub. And if a foreign object gets picked up by the tire and goes into the fender, the fender may collapse, causing you to crash.)
Equidistant bridges: Your bike needs two rear bridges: one between the seatstays and one between the chainstays (above). Many makers eliminate the chainstay bridge, which makes fender installation difficult.
The bridges should be equidistant from the rear axle. At the front, the distance between fork crown and front axle should be the same. That way, both fenders will have the same radius and follow the line of the tires.
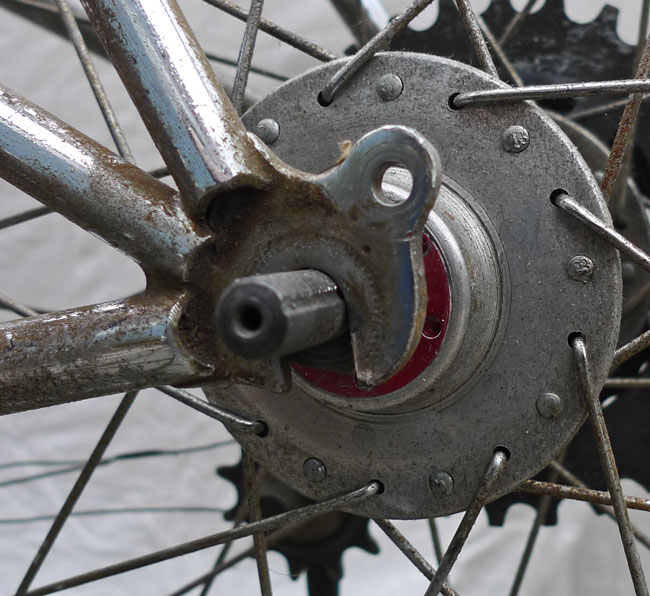
Vertical rear dropouts: The rear fender surrounds the tire on three sides and is open only at the bottom. So you want vertical dropouts, which allow your wheel to be removed downward. Horizontal dropouts require the wheel to go forward (or rearward with “track” dropouts) first, where it will hit the fender.
If you have horizontal dropouts, you will have to deflate the tire when removing the wheel (unless you have an unsightly gap between fender and tire). On bikes that need horizontal dropouts to adjust the chain tension (unless you use sliding dropouts), this is par for the course, but fender installation and wheel removal will be compromised.
Dropout eyelets: The photo above also shows the eyelet on the dropout, where the fender stay attaches. Clamps can be used instead, but they tend to move around, flex and cause all kinds of other trouble.
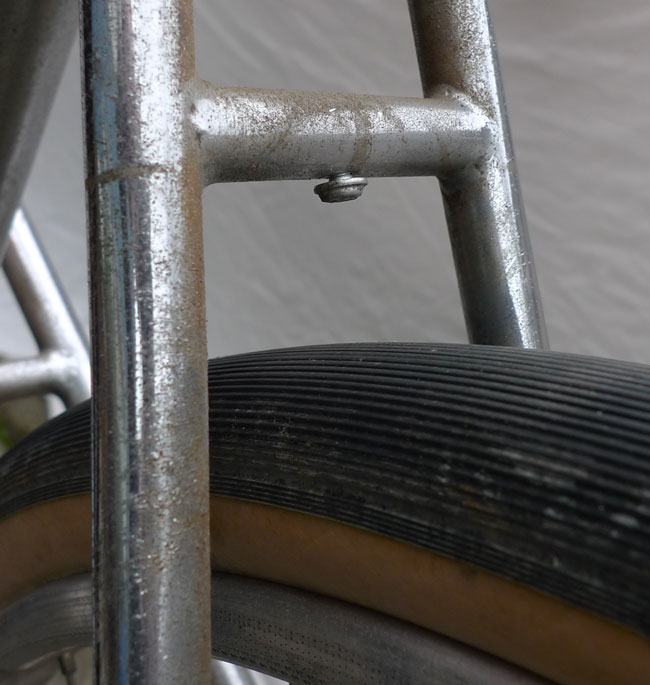
Mounting points on frame and fork: The fender is best mounted directly to the frame. To facilitate this, the bridges should have threaded holes facing the tire (above). The fork crown should also have a threaded hole facing the tire. Alternatively, an eyebolt can go onto the brake bolt or front rack bolt inside the fork crown. (The latter method was used by most French constructeurs, including Derche on the bike shown here.)
Some aluminum fenders now come with brackets, which isn’t ideal, but provides a work-around for bikes that lack dedicated fender mounting points on the seatstay bridge.
Mounting point in front of the fork crown: The front fender needs to attach to something in front of the fork crown, so it doesn’t vibrate and break prematurely. This can be a braze-on on the front rack, or a second fender stay (in which case you need eyelets on top of the front dropouts for attaching the extra stay).
If your bike doesn’t meet the requirements above, then you might want to think twice about installing metal fenders. In some cases, it can be done, but it will be a lot harder. In other cases, plastic fenders are a better alternative on a bike that isn’t designed for fenders. And some bikes just don’t work with fenders at all.
Of course, this brings up the question: Why don’t all makers design their “real-world” bikes for fenders? None of the above is rocket science, but it requires careful design and precision manufacturing. Take the placement of the seatstay bridge: Brakes usually give you about 10 mm vertical adjustment, so you have +/- 5 mm leeway when locating the bridge. Fenders are much less forgiving (+/- 1 mm). Even so, bicycle manufacturers and builders are capable of designing and building frames where the fenders drop right in during installation. It’s up to us, the customers, to demand those features. (What would you say if a maker didn’t provide a derailleur hanger, and told you to clamp a hanger to the dropout?)
Once you have determined that your bike can take metal fenders, they need to be installed correctly. To help you with this, we now include a Bicycle Quarterly article on how to install aluminum fenders with every fender set you buy from Compass Bicycles. Written by constructeur Peter Weigle and myself, it takes you through the process step by step, with detailed photos to guide you. If you need the article separately, you can order it as a back issue. (It was published in Vol. 9, No. 2.)
Aluminum fenders cannot simply be slapped onto any bike, but once installed, they do work much better and usually last much longer than plastic fenders. Even if you only ride occasionally in the rain, they are a far superior choice.
